Light Fixture Project Schedule
The light fixture project schedule contains the light fixtures used in the current project.
To create and modify light fixture types, go to
Ribbon: DM Photometrics→Schedule→ Project Schedule
Pulldown Menu: DM Photometrics→Light Fixture Project Schedule
Light Fixture Project Schedule Dialog Box

-
Callout The name of the light fixture type.
-
Press this button to rename the displayed light fixture in the schedule. Any labels on the drawing will be updated.
-
Press this button to select a light fixture from a list of all of the light fixtures in the schedule. The light fixture you select will be displayed in the dialog box, allowing you to view and modify it.
-
Press this button to select and display the next light fixture in the schedule. The next light fixture is determined by sorting the entries in the schedule alphabetically. If you press this button when viewing the last light fixture, it will wrap back to the beginning and display the first light fixture.
-
Press this button to select and display the previous light fixture in the schedule. The previous light fixture is determined by sorting the entries in the schedule alphabetically. If you press this button when viewing the first light fixture, it will wrap to the end and display the last light fixture.
-
Press this button to create a new light fixture in the schedule.
-
Press this button to copy the displayed light fixture in the schedule. The new light fixture will be created with the same information as the displayed light fixture.
-
Press this button to save any changes made to the displayed light fixture in the schedule. If you make changes and do not press this button, you will be prompted to save your changes before selecting a new light fixture or closing the schedule dialog box.
-
Press this button to delete the displayed light fixture type from the schedule. If there are any light fixtures inserted on a drawing in the project that use the light fixture type, you will not be able to delete it. You must first delete all of the light fixtures from the drawing before you can delete the light fixture type.
Photometric Calculation Information / IES File
The information in the Photometric Calculation Information section and IES File section is used during the illuminance level calculations. All of this information must be provided and be correct for the calculation to be correct.
-
Number of Heads: ▾ The number of heads on the fixture.
- One Light is distributed once in the direction of the insertion angle of the light fixture.
- Two, 90 degree offset Light is distributed in the direction of the insertion angle of the light fixture and at 90 degrees counterclockwise.
- Two, 180 degree offset Light is distributed in the direction of the insertion angle of the light fixture and at 180 degrees.
- Three Light is distributed in the direction of the insertion angle of the light fixture, at 90 degrees clockwise, and at 90 degrees counterclockwise.
- Four Light is distributed in the direction of the insertion angle of the light fixture, at 90 degrees clockwise, at 180 degrees, and at 90 degrees counterclockwise.
-
Number of Lamps: The number of lamps in the light fixture.
-
Lumens/Lamp: The number of initial lumens per lamp.
-
Lamp Depreciation: The depreciation value of each lamp (). It should be less than or equal to 1. Lamp depreciation may include fixture dirt or lens depreciation.
-
Arm Length: The length of the arm of the fixture. When calculating illuminance levels, the light source is moved this distance from the insertion point of the light fixture block.
-
Default Mounting Height: The default mounting height when this light fixture type is inserted on the drawing. The mounting height can be modified for individual light fixtures during and after insertion.
-
IES File: The IES file that is associated with the light fixture callout. IES files are provided by light fixture manufacturers and contain photometric information about the fixture. Light fixtures must have an IES file in order to calculate the illuminance levels in your project.
-
IES Rotation: The counterclockwise rotation of the IES file relative to the fixture in degrees. Use this value to rotate the IES file if it does not point in the same direction as your light fixture block.
-
Scale Factor: Multiplies the light output by the number specified. For use with IES files for which the data provided represents a single LED or LED cluster and not the entire fixture.
-
Press this button to select the IES file for the light fixture. The Select IES File dialog box will appear.

Select the IES file for this light fixture and press the button. The IES file will be attached to this light fixture and you will be asked whether to add information to the project schedule.
-
Press this button to add the information to the project schedule. The information contained in the IES file varies depending upon what the manufacturer provides. You will need to review the information that is loaded to confirm it is loaded into the correct field and that it contains useful text.
-
Press this button to only add the information from the IES file used for lighting calculations. The other information in the light fixture schedule will not be filled in based upon the information in the IES file.
Once an IES file is attached to a light fixture, the file path is displayed in the IES File field of the dialog box.
-
-
Press this button to load the IES file information into the project schedule. The information contained in the IES file varies depending upon what the manufacturer provides. You will need to review the information that is loaded to confirm it is loaded into the correct field and that it contains useful text.
You will be asked whether to add information to the project schedule.
Press the button. All of the information from the IES file will be loaded into the project schedule.
-
Press this button to detach the IES file from the light fixture. The light fixture will have no IES file associated with it after pressing this button.
Block
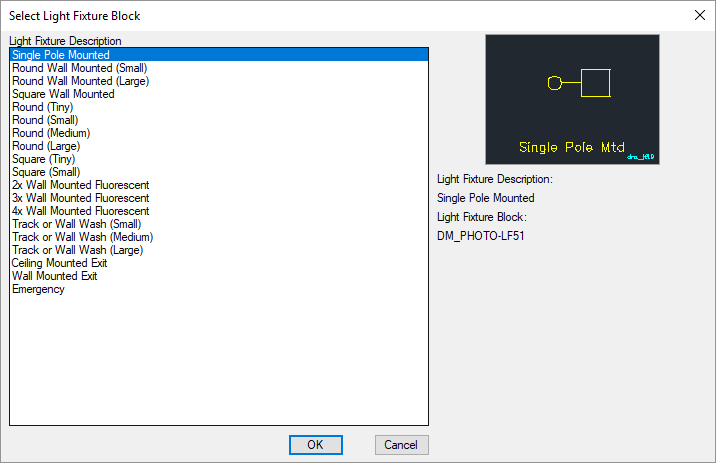
The block used to represent the light fixture on the drawing is shown here. The list of blocks can be modified using the Light Fixture Blocks→Edit Project List command.
-
Press this button to open the Select Light Fixture Block dialog box. This dialog box allows you to choose the block used to represent the light fixture on the drawing.

Schedule Information
The information in the Schedule Information section is displayed in the light fixture project schedule on the drawing. It is informational only and not used in the calculations. You can provide it to include a more comprehensive description of the light fixture in the schedule, but it is not necessary. All of the fields in this section can be left blank and the calculations will be correct.
-
☐ Include in Schedule Whether the light fixture type is displayed in the light fixture schedule that is inserted on the drawing. Most light fixture types will have this box checked. It is most commonly unchecked for existing light fixture types.
-
Fixture Description: A description of the type of light fixture. This description will appear on the light fixture schedule on the drawing.
-
Lamp Description: Description of the lamp.
-
Watts/Lamp: The wattage of each lamp.
-
Model 1, Model 2, Model 3: A description of the model for the light fixture. In the light fixture schedule, the three models can be shown in a single column or in three separate columns. See the Edit Light Fixture Schedule Layout section for more information.
-
Volts: ▾ The voltage of the light fixture.
-
� Note 1, Note 2, Note 3: These notes can be used as generic note fields that are displayed in the schedule on the drawing.
They can also be used to include information for which the software does not include a specific location. In the column labels, you can change the label on the column for that note to designate it for that information. When the schedule is printed, you will have a new field that includes the custom information.
-
Ballast: ▾ The type of ballast on the light fixture. Default ballasts are available in the list. To specify a ballast that is not included in the list, select Custom and enter the value in the field below.
-
Mounting: ▾ How the light fixtures is mounted. Default mounting types are available in the list. To specify a mounting that is not included in the list, select Custom and enter the value in the field below.
Import from Another Database
Press the button to import light fixtures from a schedule in another project to the current project. This button can be used to copy an entire schedule or a single light fixture. This button allows you to reuse light fixture schedules in new projects.
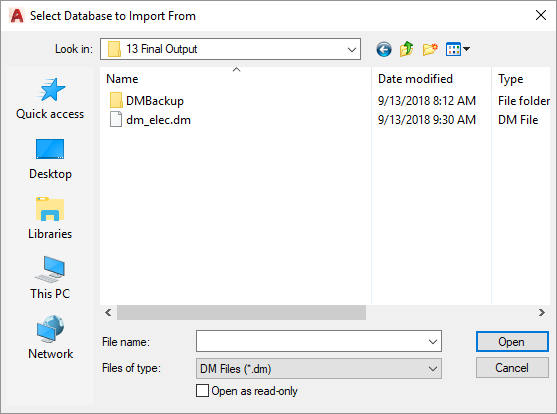
The Select Database to Import From dialog box will appear.

Select the database from which to import. You must select a Design Master Photometrics database. The database must be updated to the most current version. If it is not, you will be prompted to open a drawing in the project to convert the database. After it is updated you will then be able to import from it.
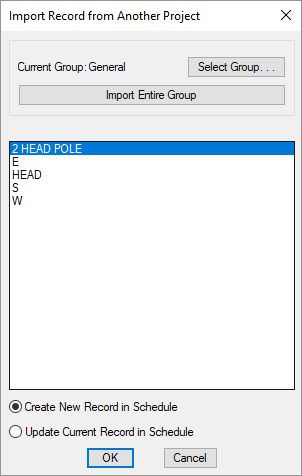
After you select the database, the Import Record from Another Project dialog box will appear.

-
Current Group: The group in the other project schedule from which the light fixtures will be imported.
-
Press this button to select a new group from which to import light fixtures.
-
Press this button to import all of the light fixtures from the Current Group to the project.
New light fixtures will be created in the project for each record being imported. If a record with the same name already exists in the current schedule, a new record will be created with (Copy) appended to the record name. The existing record will not be modified.
You will be prompted if you want to delete existing light fixtures in the project schedule. If you delete the existing light fixtures, any light fixtures that have devices associated with them will not be deleted.
-
Record List ☰ The list of light fixtures in the Current Group. Select the light fixtures to import from this list. You can select multiple light fixtures using the SHIFT and CTRL keys.
-
🔘 Create New Record in Schedule Select this option to create a new record in the project schedule for each record being imported. The record will be created with the same name as the record in the other project. If a record with the same name already exists in the current schedule, a new record will be created with (Copy) appended to the record name. The existing record will not be modified.
-
🔘 Update Current Record in Schedule Select this option to update the current record in the project schedule with the information from the imported record. All of the information in the project schedule will be overwritten.
Import from Light Fixture Master Schedule
Press the button to import light fixtures from the master schedule to the project schedule after the project has been started. The button allows you to import an entire group or individual light fixtures.
When you press the button, the Import Master Record dialog box will appear.
-
Current Group: The group in the master schedule from which the light fixtures will be imported.
-
Press this button to select a new group from which to import light fixtures.
-
Press this button to import all of the light fixtures from the Current Group to the project.
New light fixtures will be created in the project for each record being imported. If a record with the same name already exists in the current database, a new record will be created with (Copy) appended to the record name. The existing record will not be modified.
You will be prompted if you want to delete existing light fixtures in the project schedule. If you delete the existing light fixtures, any light fixtures that have items associated with them on a drawing will not be deleted.
-
Record List ☰ The list of light fixtures in the Current Group. Select the light fixtures to import from this list. You can select multiple light fixtures using the SHIFT and CTRL keys.
-
🔘 Create New Record in Schedule Select this option to create a new record in the project schedule for each record being imported. The record will be created with the same name as the record in the master schedule. If a record with the same name already exists in the current database, a new record will be created with (Copy) appended to the record name. The existing record will not be modified.
-
🔘 Update Current Record in Schedule Select this option to update the current record in the project schedule with the information from the imported record. All of the information in the project schedule will be overwritten.
Copy IES files to project folder: Sets whether loaded IES files are copied to the project folder.